고정 헤더 영역
상세 컨텐츠
본문


- 마스터노드에 대한 부하 분산과 안정성 및 가용성을 위해 구성
(순서)
- keepalived 설치 8443 포트를 개방 vip 가 생성됨
- haproxy 설치
- 개방된 8443 포트를 프론트앤드로 하여 k8s 가 생성된 경우 6443 포트와 포트 포워딩 연결
-콘트롤 플레인 1 :6443
-콘트롤 플레인 2 : 6443
<클러스터 생성>
- sudo kubeadm init --control-plane-endpoint 172.30.1.139:8443 --pod-network-cidr=10.244.0.0/16 --upload-certs
8443포트는 프론트앤드 포트이다. 각 마스터노드의 6443 포트가 바인딩된다.
<마스터노드에 조인>
kubeadm join 10.0.1.11:6443 --token qp9ycm.qq06le38rz47pqao \
--discovery-token-ca-cert-hash sha256:35cab4598f6afbfc997e07ceaeaad4dcd482112a7ff9aefcffb020b725fc822d \
--control-plane --certificate-key 152a23ebedf7a7a0ff1a1bf9ea5e51d00ff427985290236eaddbb98c6db8e626
--> 예시이므로 docs 름 참고해, ip 와 토큰 값을 입력한다.
https://kubernetes.io/docs/setup/production-environment/tools/kubeadm/high-availability/
Creating Highly Available Clusters with kubeadm
This page explains two different approaches to setting up a highly available Kubernetes cluster using kubeadm: With stacked control plane nodes. This approach requires less infrastructure. The etcd members and control plane nodes are co-located. With an ex
kubernetes.io
-keepalived 설치
yum -y install keepalived
destination port 는 8443 - 프록시서버의 진입 포트로 사용되야 한다.
cat /etc/keepalived/keepalived.conf
! Configuration File for keepalived
global_defs {
notification_email {
acassen@firewall.loc
failover@firewall.loc
sysadmin@firewall.loc
}
vrrp_script check_apiserver {
script "/etc/keepalived/check_apiserver.sh"
interval 3
weight -2
fall 10
rise 2
}
notification_email_from Alexandre.Cassen@firewall.loc
smtp_server 192.168.200.1
smtp_connect_timeout 30
router_id LVS_DEVEL
vrrp_skip_check_adv_addr
vrrp_strict
vrrp_garp_interval 0
vrrp_gna_interval 0
}
vrrp_instance VI_1 {
state MASTER
interface ens33
virtual_router_id 51
priority 100
advert_int 1
authentication {
auth_type PASS
auth_pass 1111
}
virtual_ipaddress {
192.168.200.16
192.168.200.17
192.168.200.18
}
track_script {
check_apiserver
}
}
[root@main /root]# cat /etc/keepalived/check_apiserver.sh
#!/bin/sh
errorExit() {
echo "*** $*" 1>&2
exit 1
}
APISERVER_DEST_PORT=8443
APISERVER_VIP=192.168.200.16
curl --silent --max-time 2 --insecure https://localhost:${APISERVER_DEST_PORT}/ -o /dev/null || errorExit "Error GET https://localhost:${APISERVER_DEST_PORT}/"
if ip addr | grep -q ${APISERVER_VIP}; then
curl --silent --max-time 2 --insecure https://${APISERVER_VIP}:${APISERVER_DEST_PORT}/ -o /dev/null || errorExit "Error GET https://${APISERVER_VIP}:${APISERVER_DEST_PORT}/"
fi
docs 에 따라 구성해봤다. dest 포트는 가상 ip 와 연결되고 https 요청에 응답하지 않으면 keepalived 는 inactive 되도록 구성한다.
interface ens33 - 이거은 실제 ip add 를 확인 후 인터페이스를 입력한다.
kubeadm/docs/ha-considerations.md at main · kubernetes/kubeadm
Aggregator for issues filed against kubeadm. Contribute to kubernetes/kubeadm development by creating an account on GitHub.
github.com
- haproxy 구성하기
yum -y install haproxy
vi /etc/haproxy/haproxy.cfg
- 8443 포트를 통해 접속 생성될 마스터노드의 6443 포트로 접속 되게 구성한다. 부하 분산 방식은 라운드 로빈이다.
#---------------------------------------------------------------------
# main frontend which proxys to the backends
#---------------------------------------------------------------------
frontend apiserver
bind *:8443
mode tcp
option tcplog
default_backend apiserverbackend
#---------------------------------------------------------------------
# round robin balancing for apiserver
#---------------------------------------------------------------------
backend apiserverbackend
option httpchk GET /healthz
http-check expect status 200
mode tcp
option ssl-hello-chk
balance roundrobin
server server1 172.30.1.137:6443 check
server server2 172.30.1.139:6443 check
server 형식 server1 은 고유 id 이다.
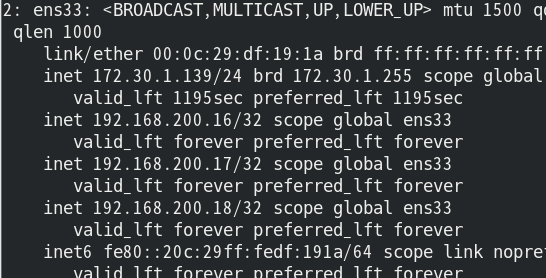
●확인
keepalived 가 구동 후 vip 와 이더넷이 연결됨 vm 의 ip 는 172.30.1.139
마스터 노드 생성
sudo kubeadm init --control-plane-endpoint 172.30.1.139:8443 --pod-network-cidr=10.244.0.0/16 --upload-certs
프록시 로드 밸런싱을 구성할 것이므로 마스터노드의 :8443 포트를 앤드 포인트로 구성한다. 결국엔 k8s 앤드포인트인 6443포트로 연결 되기 때문이다.
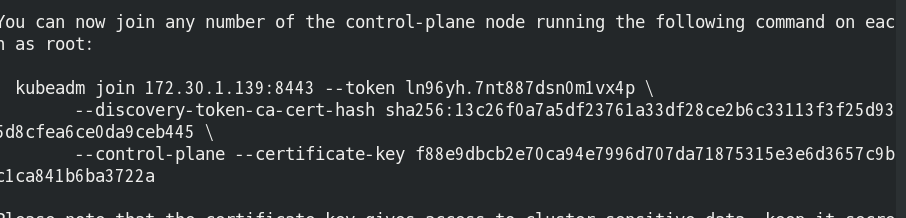
8443 포트를 통해 클러스트어와 마스터 노드가 생성된 모습이다.

콘트롤플레인의 6443 포트가 8443 포트로 바인딩 되는 모습

프록시 확인
- kubernates 가 생성되기 전 6443 포트는 닫혀있다. 그러므로 연결이 안된다.

nc -v <LOAD_BALANCER_IP> <PORT> 포트 연결 확인 명령어
-kubernetes 생성 후 확인

6443 포트로 연결이 된 모습이다.
'k8s' 카테고리의 다른 글
| nginx-ingress controller 와 베어메탈ip 로 ingress 생성해 보기 (0) | 2024.04.29 |
|---|---|
| 익스터널 etcd 구성 (0) | 2024.04.29 |
| k8s 구축해보기 (0) | 2024.04.29 |


